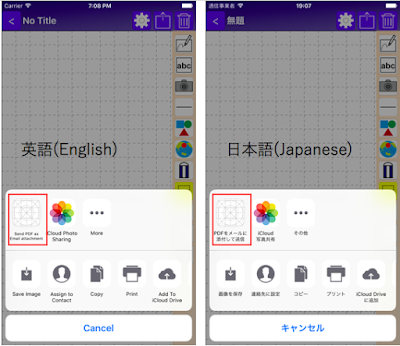
I introduce how to localize App Extensions' name this time.
環境(Environment):Xcode 8, Swift 3
まずは以下のリンクと同じ手順でApp Extensionsの呼び出し元のアプリの[PROJECT]-[info]-[Localizations]で、翻訳する言語を登録します。
At first,select [PROJECT]-[info]-[Localizations] and select languages as like below link.
[iOS]How to localize app(アプリのローカライズ)
次にApp ExtensionsにInfoPlist.stringsを追加します。
Next,add InfoPlist.string to App Extensions.
InfoPlist.stringsで[Localize...]をクリックし、[PROJECT]の[info]-[Localizations]で登録した全ての言語を選択します。
重要なのはここで全ての言語を選択することで、例えば英語ではApp Extensionsの名前を変更する必要がない場合でも、英語も選択する必要があります。さもないと他の言語でも翻訳が行われなくなります。
Click [Localize...] on InfoPlist.strings and select all languages on selected [PROJECT]-[info]-[Localizations].
Selecting all languages is important, and if you don't select a part of languages,App Extensions' name doesn't localize on all languages.
最後にInfoPlist.stringsでCFBundleDisplayNameを使用して翻訳したApp Extensionsの名称を定義します。
At last, declare App Extensions' name of various languages using CFBundleDisplayName.
InfoPlist.strings(Japanese)
"CFBundleDisplayName" = "PDFをメールに添付して送信";
尚、以前はInfo.plistで"LSHasLocalizedDisplayName=Yes"を定義する必要がありましたが、現在は不要になっています。
It was necessary to declare "LSHasLocalizedDisplayName = Yes" on Info.plist before, you don't need it at present.
[関連記事(Articles)]
[iOS]How to localize app(アプリのローカライズ)
にほんブログ村
クリエイティブライフ ブログランキングへ


0 件のコメント:
コメントを投稿